Many moons ago, there used to be a website called crackme.de, full of programs designed to be broken into by enthusiasts of the cracking scene (basically, a bunch of people who looked like they ran away form the set of Mr. Robot). Recently, I discovered a mirror of sorts for it, called crackmes.one. So I thought I’d give one of them a go.
Note that the crackme I’m looking at here is being run inside a VM that doesn’t contain any important data. I’m being cautious about a piece of software that I downloaded from an untrusted website.
As the first crackme to try, I chose one with the lowest difficulty score. It’s called keyg3nme and can be found here. We will go through it step by step to make sure we have a good understanding of the underlying program. I will go through the x86 instructions in detail, so if you are familiar with x86 assembly, you may want to skip parts of this post.
Once we dive into the disassembly of the crackme, we will find out that solving it is actually trivial on account of one valid key being exposed as an immediate value. Nonetheless, what is interesting to me is not necessarily the solution, but how to get there.

Getting Started
We’re going to start by using GDB to examine the crackme’s binary:
thebel:/home/thebel/crackme/completed/keyg3nme$ gdb
GNU gdb (Debian 8.3.1-1) 8.3.1
Copyright (C) 2019 Free Software Foundation, Inc.
[...]
(gdb) file keyg3nme
Reading symbols from keyg3nme...(no debugging symbols found)...done.
(gdb) run
Starting program: /home/thebel/crackme/completed/keyg3nme/keyg3nme
Enter your key:  ^C
Program received signal SIGINT, Interrupt.
0x00007fffff110081 in __GI___libc_read (fd=0, buf=0x8005470, nbytes=512) at ../sysdeps/unix/sysv/linux/read.c:27
27      ../sysdeps/unix/sysv/linux/read.c: No such file or directory.
What I’ve done in the listing above is:
- loaded the crackme
filecalledkeyg3nme, runthe program inside the binary file,- and interrupted execution using
CTRL-C.
The reason we want to interrupt execution is so we can print the call stack at that point. That makes it easier to find the main() function. Turns out, the symbols weren’t stripped, so we can use main as a name rather than having to work out the function’s address. Admittedly, I could have figured that out by running file on the binary:
thebel:/home/thebel/crackme/completed/keyg3nme$ file keyg3nme
keyg3nme: ELF 64-bit LSB shared object, x86-64, version 1 (SYSV), dynamically linked, interpreter /lib64/ld-linux-x86-64.so.2, BuildID[sha1]=01d8f2eefa63ea2a9dc6f6ceb2be2eac2ca22a67, for GNU/Linux 3.2.0, not stripped
Anyway, here’s the backtrace at the input prompt:
(gdb) bt
#0  0x00007fffff110081 in __GI___libc_read (fd=0, buf=0x8005470, nbytes=512) at ../sysdeps/unix/sysv/linux/read.c:27
#1  0x00007fffff08d148 in _IO_new_file_underflow (fp=0x7fffff3eba00 <_IO_2_1_stdin_>) at fileops.c:531
#2  0x00007fffff08e3f2 in __GI__IO_default_uflow (fp=0x7fffff3eba00 <_IO_2_1_stdin_>) at genops.c:380
#3  0x00007fffff06bbea in _IO_vfscanf_internal (s=<optimized out>, format=<optimized out>, argptr=argptr@entry=0x7ffffffee1d0, errp=errp@entry=0x0) at vfscanf.c:630
#4  0x00007fffff07bfd8 in __isoc99_scanf (format=<optimized out>) at isoc99_scanf.c:37
#5  0x00000000080011a5 in main ()
Examining main()
What we want to do next is examine the disassembly of main() and set a breakpoint at the command prompt. This will allow us to figure out how main() works and where data such as our input value are stored. Note that I am using Intel disassembly syntax since I find it clearer. In Intel syntax, the destination operand is on the left, mimicking the variable assignment syntax in most programming languages, i.e. var = 3 becomes, say, mov eax,0x3. The disassembly for main() looks like this:
(gdb) disas main
Dump of assembler code for function main:
   0x0000000008001165 <+0>:     push   rbp
   0x0000000008001166 <+1>:     mov    rbp,rsp
   0x0000000008001169 <+4>:     sub    rsp,0x10
   0x000000000800116d <+8>:     mov    rax,QWORD PTR fs:0x28
   0x0000000008001176 <+17>:    mov    QWORD PTR [rbp-0x8],rax
   0x000000000800117a <+21>:    xor    eax,eax
   0x000000000800117c <+23>:    lea    rdi,[rip+0xe85]        # 0x8002008
   0x0000000008001183 <+30>:    mov    eax,0x0
   0x0000000008001188 <+35>:    call   0x8001050 <printf@plt>
   0x000000000800118d <+40>:    lea    rax,[rbp-0xc]
   0x0000000008001191 <+44>:    mov    rsi,rax
   0x0000000008001194 <+47>:    lea    rdi,[rip+0xe7f]        # 0x800201a
   0x000000000800119b <+54>:    mov    eax,0x0
   0x00000000080011a0 <+59>:    call   0x8001060 <__isoc99_scanf@plt>
   0x00000000080011a5 <+64>:    mov    eax,DWORD PTR [rbp-0xc]
   0x00000000080011a8 <+67>:    mov    edi,eax
   0x00000000080011aa <+69>:    mov    eax,0x0
   0x00000000080011af <+74>:    call   0x80011ee <validate_key>
   0x00000000080011b4 <+79>:    cmp    eax,0x1
   0x00000000080011b7 <+82>:    jne    0x80011c7 <main+98>
   0x00000000080011b9 <+84>:    lea    rdi,[rip+0xe60]        # 0x8002020
   0x00000000080011c0 <+91>:    call   0x8001030 <puts@plt>
   0x00000000080011c5 <+96>:    jmp    0x80011d3 <main+110>
   0x00000000080011c7 <+98>:    lea    rdi,[rip+0xe73]        # 0x8002041
   0x00000000080011ce <+105>:   call   0x8001030 <puts@plt>
   0x00000000080011d3 <+110>:   mov    eax,0x0
   0x00000000080011d8 <+115>:   mov    rdx,QWORD PTR [rbp-0x8]
   0x00000000080011dc <+119>:   xor    rdx,QWORD PTR fs:0x28
   0x00000000080011e5 <+128>:   je     0x80011ec <main+135>
   0x00000000080011e7 <+130>:   call   0x8001040 <__stack_chk_fail@plt>
   0x00000000080011ec <+135>:   leave
   0x00000000080011ed <+136>:   ret
End of assembler dump.
I’ve hightlighted some lines that contain interesting function calls which we can use to break up main() into bite-sized chunks.
The Input Prompt
The first is a call to printf() at offset +35: call 0x8001050 <printf@plt>. The way assembler works, the arguments to a function hav eto be set up before-hand, by either placing them into registers or on the stack, depending on the calling convention and types of arguments. Typically, the compiler will place the instructions that set up the function arguments immediately before the call to a given function. There are two lines preceding the call to printf() that place values using the mov and lea instructions:
   0x000000000800117c <+23>:    lea    rdi,[rip+0xe85]        # 0x8002008
   0x0000000008001183 <+30>:    mov    eax,0x0
   0x0000000008001188 <+35>:    call   0x8001050 <printf@plt>
The first instruction is called load effective address or lea. What it does is load the computed address, represented by the second operand, into the first operand. Here, it will resolve rip+0xe85 first, which GDB tells us is 0x8002008 (on the right side of the line). Then, lea will load that address into the destination, rdi. I’m going to go out on a limb and say it’s a string:
(gdb) x/s 0x8002008
0x8002008:      "Enter your key:  "
Well, what do you know, it’s the string containing the input prompt.
The mov instruction, on the other hand, does precisely what it says on the tin: it moves data from one place to another. For example, from memory to a register, from one register to another, or, as in this case, the constant integer 0x0 is moved into register eax. Not terribly interesting.
Position-Independent Code
A small detour on what lea is doing here: lea rdi,[rip+0xe85]. Note that the second operand adds a consant integer 0xe85 to the instruction pointer rip. This allows for construction position-independent code. This allows code to be located anywhere in memory and still be able to access its data section, due to there being a predicable offset between the .text section and the .data section. This is particularly useful for sofware libraries, because they won’t know where in memory they are going to end up being loaded into. By using offsets rather than absolute addresses, this can be mitigated. A great explanation of this mechanism can be found here.
Reading The Input
The next call is to scanf() at offset +59, which reads text form standard input (e.g. the keyboard). That’s the point at which I had stopped the program using CTRL+C. What we want to know first is what type of data the program expects to read int. We can do this by inspecting the format string supplied to scanf(). How do I know this? Since scanf() is a function in the standard I/O libary, we can look up its man page and find out which arguments it accepts. Since the format string is, well, a string, we are looking for a pointer somewhere in the lines of assembly before scanf() is called. Let’s take a closer look:
   0x0000000008001188 <+35>:    call   0x8001050 <printf@plt>
   0x000000000800118d <+40>:    lea    rax,[rbp-0xc]
   0x0000000008001191 <+44>:    mov    rsi,rax
   0x0000000008001194 <+47>:    lea    rdi,[rip+0xe7f]        # 0x800201a
   0x000000000800119b <+54>:    mov    eax,0x0
   0x00000000080011a0 <+59>:    call   0x8001060 <__isoc99_scanf@plt>
The highlighted line contains an lea instruction, which we had looked at in the previous section. It loads the computed address rip+0xe7f into the register rdi. GDB has done the work for us here and prints the computed address on the right: 0x800201a. Let’s examine it:
(gdb) x/s 0x800201a
0x800201a:      "%d"
That sure looks like a format string to me. What %d means in the context of scanf() or printf() is an integer. Check out the “Conversions” section of scanf()‘s man page for more info. Since we are reading an int, scanf() must then also populate a pointer to int with the value we enter at the input prompt. We want to know where that integer will end up, so let’s add a breakpoint to the program at the instruction immediately after the call to scanf() and then run the program:
(gdb) b *0x00000000080011a5
Breakpoint 1 at 0x80011a5
(gdb) run
Starting program: /home/thebel/crackme/completed/keyg3nme/keyg3nme
Enter your key:  123

Breakpoint 1, 0x00000000080011a5 in main ()
I’ve entered the integer 123 as the key, so that is the value we are looking for. We will begin by looking at the CPU registers to see if we can find it there:
(gdb) info reg
rax            0x1      1
rbx            0x0      0
rcx            0x10     16
rdx            0x7fffff3ed8d0   140737475696848
rsi            0x1      1
rdi            0x0      0
rbp            0x7ffffffee2c0   0x7ffffffee2c0
rsp            0x7ffffffee2b0   0x7ffffffee2b0
r8             0x0      0
r9             0x0      0
r10            0x7fffff19ecc0   140737473277120
r11            0x800201c        134225948
r12            0x8001080        134221952
r13            0x7ffffffee3a0   140737488282528
r14            0x0      0
r15            0x0      0
rip            0x80011a5        0x80011a5 <main+64>
eflags         0x206    [ PF IF ]
cs             0x33     51
ss             0x2b     43
ds             0x0      0
es             0x0      0
fs             0x0      0
gs             0x0      0
The first column is the name of the register, the second is the value inside it represented in hexadecimal, and finally the third column is an attempt by GDB to pretty-print that value. Notice that the instruction pointer rip currently points to the instruction at which we set the breakpoint. The registers rbp and rsp hold the frame pointer and stack pointer, respectively, which are the boundaries of the current function’s stack frame.
However, none of the registers seems to contain what we are looking for. That means that the value we entered must be located in memory somewhere. But where? We could of course examine the disassembly of scanf() and find out where the first pointer passed to it gets stored. That seems rather cumbersome. Instead, we can examine the instructions between the call to scanf() and the next call, to validate_key():
   0x00000000080011a0 <+59>:    call   0x8001060 <__isoc99_scanf@plt>
=> 0x00000000080011a5 <+64>:    mov    eax,DWORD PTR [rbp-0xc]
   0x00000000080011a8 <+67>:    mov    edi,eax
   0x00000000080011aa <+69>:    mov    eax,0x0
   0x00000000080011af <+74>:    call   0x80011ee <validate_key>
There are three instructions between the two calls. The last two only manipulate registers. The first, however, involves a pointer to a location in memory. I’m going to wager that we will find the value we entered there. The pointer points to a space in memory the size of a double word, in other words 32 bits or 4 bytes. That happens to be the size of an integer. We can verify that this is true using GDB to output the size of an integer:
(gdb) p sizeof(int)
$1 = 4
As an aside, for more information about double words versus quad-words, check out this blog post.
Now that we have identified the instruction which likely references the number we entered, we can examine the memory at the relevant address:
(gdb) x/wd $rbp-0xc
0x7ffffffee2b4: 123
And there it is! I have included sizing information in the above x command by passing the “argument” w. Though w stands for word, it actually refers to the same size as a double word, which is 4 bytes. That’s not confusing at all! I have no idea what you’re talking about…
Conditional Print Statements
We will take a small detour toward the end of main(), so that we can take a look at the conditional print statements. There are two calls to puts(), which is a function that prints a string to the console:
   0x00000000080011af <+74>:    call   0x80011ee <validate_key>
   0x00000000080011b4 <+79>:    cmp    eax,0x1
   0x00000000080011b7 <+82>:    jne    0x80011c7 <main+98>
   0x00000000080011b9 <+84>:    lea    rdi,[rip+0xe60]        # 0x8002020
   0x00000000080011c0 <+91>:    call   0x8001030 <puts@plt>
   0x00000000080011c5 <+96>:    jmp    0x80011d3 <main+110>
   0x00000000080011c7 <+98>:    lea    rdi,[rip+0xe73]        # 0x8002041
   0x00000000080011ce <+105>:   call   0x8001030 <puts@plt>
Which of the two calls to puts() is made depends on the value of eax upon returning from validate_key(). The register eax is typically used to hold the return value of a function in many popular calling conventions. Here, we are using cdecl. If validate_key() returns 0x1, then the string at address 0x8002020 is printed (offset +84). If validate_key() returns something else (e.g. 0x0), then the string at address 0x8002041 is printed (offset +98). Let’s examine the strings to find out what their purpose might be:
(gdb) x/s 0x8002020
0x8002020:      "Good job mate, now go keygen me."
(gdb) x/s 0x8002041
0x8002041:      "nope."
From the two strings, we can infer that if validate_key() returns 0x1, we got the key right, and 0x0 if not. Next, we’re going to examine validate_key().
Inspecting validate_key()
It appears that the integer entered by the user is subsequently passed to a function called validate_key(). This is likely where the magic happens and the entered value is compared to some stored key. I will assume that the stored key is not plainly visible, but rather that we will have to compute it. To facilitate a step by step analysis of validate_key(), we will print its disassembly and set a breakpoint at the first instruction:
(gdb) disas validate_key
Dump of assembler code for function validate_key:
   0x00000000080011ee <+0>:     push   rbp
   0x00000000080011ef <+1>:     mov    rbp,rsp
   0x00000000080011f2 <+4>:     mov    DWORD PTR [rbp-0x4],edi
   0x00000000080011f5 <+7>:     mov    ecx,DWORD PTR [rbp-0x4]
   0x00000000080011f8 <+10>:    mov    edx,0x1acb0aad
   0x00000000080011fd <+15>:    mov    eax,ecx
   0x00000000080011ff <+17>:    imul   edx
   0x0000000008001201 <+19>:    sar    edx,0x7
   0x0000000008001204 <+22>:    mov    eax,ecx
   0x0000000008001206 <+24>:    sar    eax,0x1f
   0x0000000008001209 <+27>:    sub    edx,eax
   0x000000000800120b <+29>:    mov    eax,edx
   0x000000000800120d <+31>:    imul   eax,eax,0x4c7
   0x0000000008001213 <+37>:    sub    ecx,eax
   0x0000000008001215 <+39>:    mov    eax,ecx
   0x0000000008001217 <+41>:    test   eax,eax
   0x0000000008001219 <+43>:    jne    0x8001222 <validate_key+52>
   0x000000000800121b <+45>:    mov    eax,0x1
   0x0000000008001220 <+50>:    jmp    0x8001227 <validate_key+57>
   0x0000000008001222 <+52>:    mov    eax,0x0
   0x0000000008001227 <+57>:    pop    rbp
   0x0000000008001228 <+58>:    ret
End of assembler dump.
(gdb) b *0x00000000080011ee
Breakpoint 2 at 0x80011ee
Looking at the disassembly, it looks like there is some sort of computatoin happening between offsets +17 and +39. Following that, there is a conditional jump instruction, jne, which responds to the ZF flag set in the preceding test instruction. If the flag is set, 0x1 is moved into eax at offset +45. If not, 0x0 is moved into eax. To me, this looks like the computation yields some result, and, if this result has some value, the function returns true (0x1), and if not, returns false (0x0). Remember that we determined in the previous section that validate_key() returning 0x1 means we got the right key. We must therefore figure what key to enter into the prompt such that validate_key() returns 0x1.
Next, we’re going to continue to our breakpoint and print out the contents of the CPU registers:
(gdb) cont
Continuing.

Breakpoint 2, 0x00000000080011ee in validate_key ()
(gdb) disas
Dump of assembler code for function validate_key:
=> 0x00000000080011ee <+0>:     push   rbp
   0x00000000080011ef <+1>:     mov    rbp,rsp
   0x00000000080011f2 <+4>:     mov    DWORD PTR [rbp-0x4],edi
   0x00000000080011f5 <+7>:     mov    ecx,DWORD PTR [rbp-0x4]
   0x00000000080011f8 <+10>:    mov    edx,0x1acb0aad
   0x00000000080011fd <+15>:    mov    eax,ecx
   0x00000000080011ff <+17>:    imul   edx
   0x0000000008001201 <+19>:    sar    edx,0x7
   0x0000000008001204 <+22>:    mov    eax,ecx
   0x0000000008001206 <+24>:    sar    eax,0x1f
   0x0000000008001209 <+27>:    sub    edx,eax
   0x000000000800120b <+29>:    mov    eax,edx
   0x000000000800120d <+31>:    imul   eax,eax,0x4c7
   0x0000000008001213 <+37>:    sub    ecx,eax
   0x0000000008001215 <+39>:    mov    eax,ecx
   0x0000000008001217 <+41>:    test   eax,eax
   0x0000000008001219 <+43>:    jne    0x8001222 <validate_key+52>
   0x000000000800121b <+45>:    mov    eax,0x1
   0x0000000008001220 <+50>:    jmp    0x8001227 <validate_key+57>
   0x0000000008001222 <+52>:    mov    eax,0x0
   0x0000000008001227 <+57>:    pop    rbp
   0x0000000008001228 <+58>:    ret
End of assembler dump.
(gdb) info reg
rax            0x0      0
rbx            0x0      0
rcx            0x10     16
rdx            0x7fffff3ed8d0   140737475696848
rsi            0x1      1
rdi            0x7b     123
rbp            0x7ffffffee2c0   0x7ffffffee2c0
rsp            0x7ffffffee2a8   0x7ffffffee2a8
r8             0x0      0
r9             0x0      0
r10            0x7fffff19ecc0   140737473277120
r11            0x800201c        134225948
r12            0x8001080        134221952
r13            0x7ffffffee3a0   140737488282528
r14            0x0      0
r15            0x0      0
rip            0x80011ee        0x80011ee <validate_key>
eflags         0x206    [ PF IF ]
cs             0x33     51
ss             0x2b     43
ds             0x0      0
es             0x0      0
fs             0x0      0
gs             0x0      0
If we look closely, we can see that the value we entered (123) is currently located in rdi. Note that edi and rdi refer to the lower 32 bits and lower 64 bits of the same register, respectively. How it got there, have a look at offsets +59 through +74 in main(). We will keep a close eye on what happens to that value so that we can figure out what validate_key() does. Let’s skip ahead six instructions to the beginning of the computation block, and review what the interceding instructions did:
(gdb) stepi 6
0x00000000080011ff in validate_key ()
(gdb) disas
Dump of assembler code for function validate_key:
   0x00000000080011ee <+0>:     push   rbp
   0x00000000080011ef <+1>:     mov    rbp,rsp
   0x00000000080011f2 <+4>:     mov    DWORD PTR [rbp-0x4],edi
   0x00000000080011f5 <+7>:     mov    ecx,DWORD PTR [rbp-0x4]
   0x00000000080011f8 <+10>:    mov    edx,0x1acb0aad
   0x00000000080011fd <+15>:    mov    eax,ecx
=> 0x00000000080011ff <+17>:    imul   edx
[...]
In the highlighted lines, the value located in edi is first copied to the computed address rbp-0x4 and then that is copied into the register ecx. Following that, at +10, some magic number is copied into edx. Finally, the value in ecx (i.e. 123, the key we entered) is copied to eax. This means we now have several copies of the key we entered, as we can see here:
(gdb) info reg
rax            0x7b     123
rbx            0x0      0
rcx            0x7b     123
rdx            0x1acb0aad       449514157
rsi            0x1      1
rdi            0x7b     123
[...]
(gdb) x/wd $rbp-0x4
0x7ffffffee29c: 123
Key Computation
In this section, we will (crudely) reverse engineer the computation that forms the body of validate_key():
(gdb) disas validate_key+17,validate_key+43
Dump of assembler code from 0x80011ff to 0x8001219:
=> 0x00000000080011ff <validate_key+17>:        imul   edx
   0x0000000008001201 <validate_key+19>:        sar    edx,0x7
   0x0000000008001204 <validate_key+22>:        mov    eax,ecx
   0x0000000008001206 <validate_key+24>:        sar    eax,0x1f
   0x0000000008001209 <validate_key+27>:        sub    edx,eax
   0x000000000800120b <validate_key+29>:        mov    eax,edx
   0x000000000800120d <validate_key+31>:        imul   eax,eax,0x4c7
   0x0000000008001213 <validate_key+37>:        sub    ecx,eax
   0x0000000008001215 <validate_key+39>:        mov    eax,ecx
   0x0000000008001217 <validate_key+41>:        test   eax,eax
End of assembler dump.
Remember the bit at the start of this post about how the solution is trivial? There are three magic numbers in the above listing. Can you spot them?
One of them is 0x4c7 which is 1223 in decimal notation. I tried to enter it as the key on a whim, and, what do you know, it actually worked.

While I was playing around with this crackme, I found it was possible to pass the check using a different number as well. There may be more possibillities than that. To help me understand what validate_key() does, I decided to try my hand at reverse engineering it. After much tinkering, I came up with this monstrosity:
#include <stdlib.h>
#include <stdio.h>
#include <stdint.h>

int validate_key(uint32_t input)
{
    uint64_t tmp1 = (uint64_t)input * 0x1acb0aad;
    uint64_t tmp2 = (uint32_t)tmp1 >> 0x1f;
    uint64_t tmp3 = (tmp1 >> 0x20) >> 0x7;
    uint64_t tmp4 = input - ((tmp3 - tmp2) * 0x4c7);

    if (tmp4 == 0) {
        return 1;
    }
    else {
        return 0;
    }
}

int main()
{

    int input;

    printf("Enter your key:  ");
    scanf("%d", &input);

    if (validate_key(input)) {
        puts("Good job mate, now go keygen me.");
    }
    else {
        puts("nope.");
    }

    return 0;
}
You might wonder what uint64_t tmp2 = (uint32_t)tmp1 >> 0x1f; is and what purpose it serves. This line uses a trick of sorts to split off the least significant 32 bits of tmp1 and then right-shift them by 0x1f. Due to the order in which bytes are stored on little-endian systems, we can access the least significant 32 bits of a 64-bit unsigned integer (e.g. a uint64_t or an unsigned long) by simply casting it to a 32-bit unsigned integer. The program will then only access those bits and ignore the rest. In fact, as long as the source integer is not signed, you can even cast it to a signed integer as well. Don’t do either of these things. They are extremely hackish and were used here because I thought the alternative, uint64_t tmp2 = ((tmp1 << 0x20) >> 0x20) >> 0x1f; was even less readable.
Based on my limited tests, my program replicates the behavior of the original exactly. The instructions used in the body of the original validate_key() are limited to just these four:
movimulsarsub
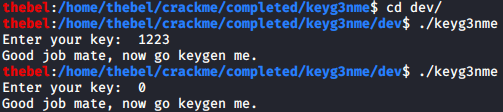
To find out what they do, check out this reference list. As for the process, I tried to write a bit of C code to replicate the mechanism of each of the instructions, and then gluing it all together. Looking at my crude implementation of validate_key(), I noticed that another key had to work besides 1223. That key is 0. We can try it:

The above is the original crackme. The compiled form of my attempt at reverse engineering behaves the same for those inputs:
To verify that the two programs behaved the same for all inputs, I ran the following one-liner for each:
$ for i in $(seq 0 9999); do echo ${i}; echo ${i} | ./keyg3nme; done | tee ./keyg3nme_tests.txt
When I diffed the two files, they were identical:

The test is limited, so there may still be some errors in my program.
Bit Shifting Is Weird
Once you look under the hood, one confusing property of bit shifting is that it actually doesn’t do what it says on the tin at all. At least not when the underlying architecture is little-endian. That’s because a little-endian architecture stores the bytes making up a number in reverse order to the typical representation of a number.
The number 123456 has the most significant digit on the left and the least significant one on the right. Its hexadecimal representation is likewise rendered in this way: 0x1e240. However, in memory, the bytes that make up that number are stored the other way around. This can be demonstrated in GDB quite easily:
(gdb) set tmp1 = 123456
(gdb) x/4bt &tmp1
0x7ffffffee240: 01000000        11100010        00000001        00000000
(gdb) set tmp2 = tmp1 << 1
(gdb) x/4bt &tmp2
0x7ffffffee248: 10000000        11000100        00000011        00000000
Note that each of the four bytes of tmp1 and tmp2, respectively, are rendered by GDB in big-endian notation. So, the most significant bit of each byte is on the left. Which is why, after bit-shifting tmp1 by one bit to the left, each of the ones in each of the bytes moves left. Except the third byte. Where does that extra one on the right come from? It’s the left-most bit of the second byte. This is because bit-shifting left shifts the bits to the right on a little-endian system. Yes, it’s true. I’m not just imagining things, I swear. This can become profoundly irritating when you are examining memory, because depending on which size letter you use for x in GDB, parts of the data may be rendered in little-endian notation, while other parts may be renderd in big-endian notation. Beware!
Bottom Line
I went a little bit nuts trying to get to the bottom of things and I had a lot of fun doing it! I still don’t really understand the algorithm used by validate_key(). Perhaps someone more intelligent than me can figure it out.
